React概念
1.Redux
redux主要用来做组件间的状态分享和管理,相比state,props,context这些共享方法,redux比较适合兄弟层级组件间数据共享,redux中管理的数据更像是基于根的,理解上有点类似window.Global内添加变量。
2.Context
当项目中有多个层级的嵌套组件时,最底层的组件要用到最顶层组件的state数据时。层层手动传递props变的很麻烦,又觉得没必要应用redux来共享,造成Store里的state过多。此场景比较适合用Context来实现。理解上有点类似window.pageA.Global。
context中共享的值,都是在最顶级组件操作的,修改值时,需要将修改state的函数也传递下去。
import Grandson from "../components/main";
export const ThemeContext = React.createContext({
    name:"zz"
});
class Index extends Component{
    constructor(...args) {
        super(...args);
        this.state = {
            name:'zz1'
        }
    }
    render(){
        return (
            <ThemeContext.Provider value={{
                name:this.state.name,  //传递数据
                setname:(val)=>{       //修改值得方法传递
                    this.setState({
                        name:val
                    })
                }
            }}>
                <Grandson></Grandson>
            </ThemeContext.Provider>
        )
    }
}
//========================
import {ThemeContext} from '@/view/index'
class Grandson extends React.Component {
  constructor(...args) {
    super(...args);
    Grandson.contextType = ThemeContext;
  }
  render() {
    return (
      <div>
        这里是孙组件
        顶级传来的数据:{this.context.name}
        <div onClick={this.context.setname.bind(this,'newname')}>点击更新</div>
      </div>
    );
  }
}
3.Portals
Portal提供了一种将子节点渲染到存在于父组件以外的 DOM 节点的优秀的方案。类似vue中的slot插槽,父组件调用子组件时,包含一段内容<Modal><div>a</div></Modal>。子组件通过ReactDOM.createPortal(n,el)来获取内容a,并且渲染到指定的dom节点上,该节点可以是父节组件之外的dom节点。
内容中的事件冒泡,还是安装react节点来排列的,不按照真实dom节点排列。当子组件将内容渲染到父节点以外时,比如是父节点兄弟节点。此时点击该内容,父组件上的点击事件会触发。
4.Render Props
是指一种在 React 组件之间使用一个值为函数的 prop 共享代码的简单技术。这段官网的解释有点干涩。主要使用场景是当一个组件只输出基础数据时,当父组件调用它时,又需要在该基础数据上封装一些扩展功能。为了不再多封装一层组件。父组件在调用基础组件时,将要扩展的部分,直接以函数的形式传递进去。
//父组件
<Mouse render={function(childstate){   //传递render可命名为其它,childstate为子组件state
     return <Cat stateA={childstate} />
}}></Mouse>
//====================
//子组件
 return (
      <div style={{ height: '100vh' }} onMouseMove={this.handleMouseMove}>
        {this.props.render(this.state)}   //子组件接收父组件调用时传入的扩展结构,并和自身的state关联
      </div>
    );
  }
5.refs转发
父组件调用子组件中ref的dom,实现父组件直接操作子组件dom
React生命周期
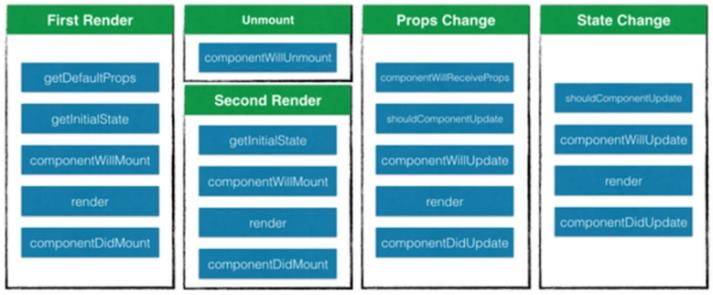
react16之前的生命周期
react16之后的生命周期
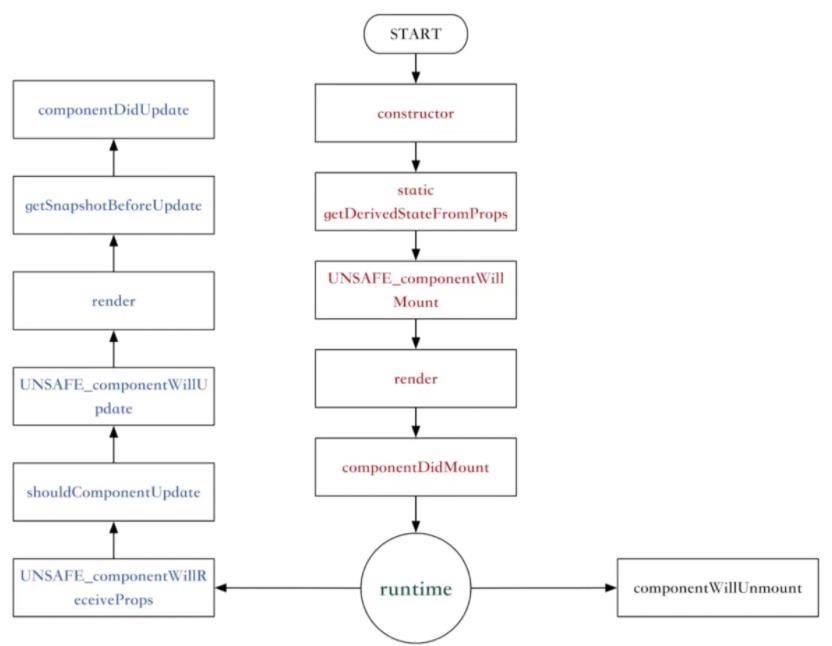
1.组件中ajax获取数据改变state的动作,推荐在componentDidMount中执行,不在UNSAFE_componentWillMount中执行.
2.React意识到 componentWillMount 、 componentWillReceiveProps 和 componentWillUpdate 这三个生命周期函数有缺陷,比较容易导致崩溃。但是由于旧的项目已经在用以及有些老开发者习惯用这些生命周期函数,于是通过给它加 UNSAFE_ 来提醒用它的人要注意它们的缺陷
3.React加入了两个新的生命周期函数 getSnapshotBeforeUpdate 和 getDerivedStateFromProps ,目的为了即使不使用这三个生命周期函数,也能实现 只有这三个生命周期能实现 的功能。
4.UNSAFE_前缀主要为了提醒一些情况下的问题.比如setState在componentWillMount和componentWillUpdate中多次执行时,影响render和componentWillUnmount进行清理.推荐放在componentDidMount和componentDidUpdate中执行.
5.UNSAFE_componentWillReceiveProps是为了提醒componentWillReceiveProps生命周期是在props更新时触发。一般用于 props 参数更新时同步更新state参数。但如果在 componentWillReceiveProps 生命周期直接调用父组件的某些有调用setState 的函数,会导致程序死循环
6.getDerivedStateFromProps是官方在16.3新加入的生命周期函数,props变化时被调用,若是父组件重新渲染,也会被调用。它返回新的props值。是静态函数,不能访问this,接收两个参数nextProps, prevState.不保存prevProps.getDerivedStateFromProps 正是官方新加入的用以替代 componentWillReceiveProps 的方案
7.getSnapshotBeforeUpdate是跟 getDerivedStateFromProps 一起,在16.3新加入的生命周期函数。触发的时机在最近的更改被提交到 DOM 元素前,使得组件可以在更改之前获得当前值,此生命周期返回的任意值都会作为第三个参数传给componentDidUpdate 。
React性能优化
1.重复渲染
当组件的props或state改变时,组件会重新渲染,而react会以组件为根,重新渲染整个组件子树。有些props,state的改变不用重新渲染,此时如何避免这些不必要的render.
一种方式是生命周期shouldComponentUpdate,默认返回ture,返回false时不会重写render,而且该方法并不会在初始化渲染或当使用forceUpdate()时被调用.
shouldComponentUpdate(nextProps,nextState){
    if(nextState.num==this.state.num){  //与PureComponent效果相同
        return false;
    }
    return true;
}
还有一种方式是React.PureComponent,React.PureComponent 与 React.Component 几乎完全相同,但 React.PureComponent 通过props和state的浅对比来实现 shouldComponentUpate()
无论组件是否是 PureComponent,如果定义了 shouldComponentUpdate(),那么会调用它并以它的执行结果来判断是否 update。在组件未定义 shouldComponentUpdate() 的情况下,会判断该组件是否是 PureComponent,如果是的话,会对新旧 props、state 进行 shallowEqual 比较,一旦新旧不一致,会触发 update。针对以上规则我们在项目开发种可以做出如下优化:
PureComponent应用在class组件中,在函数组件中使用React.memo().React.memo()可接受2个参数,第一个参数为纯函数的组件,第二个参数用于对比props控制是否刷新,与shouldComponentUpdate()功能类似。
被react-redux的connect方法连接的组件,默认变为了PureComponent
PureComponent组件响应度体现在,1.组件自己的state改变时是否render 2.组件父级的props改变时是否render
import React from "react";
function Child({seconds}){
    console.log('I am rendering');
    return (
        <div>I am update every {seconds} seconds</div>
    )
};
function areEqual(prevProps, nextProps) {
    if(prevProps.seconds===nextProps.seconds){
        return true
    }else {
        return false
    }
}
export default React.memo(Child,areEqual)
shallowEqual浅拷贝对对象间的比较,只会比较引用地址是否一样,不会递归地去深层比较。
尽量将复杂类型数据(ArrayList)所关联的视图单独拆成PureComonent有助于提高渲染性能,比如表单、文本域和复杂列表在同一个 render() 中,表单域的输入字段改变会频繁地触发 setState() 从而导致 组件 重新 render()。而用于渲染复杂列表的数据其实并没有变化,但由于重新触发 render(),列表还是会重新渲染。
2.重复执行(useMemo/useCallback)
useMemo功能是判断组件中的函数逻辑是否重新执行,用来优化性能,可以用来实现VUE中计算属性的功能。
const [count, setCount] = useState(0);
//这里只有count发生变化double才会重新计算
const double = useMemo(() => {
    return count * 2;
}, [count]);
//这样返回的函数就会在组件重渲染时产生相同的句柄
const onClick = useMemo(() => {
    //这里返回的依然是函数
    return () => {
      console.log('click')
    }
}, []);
如果useMemo返回的是一个函数,则可以用useCallback省略顶层的函数。 将包裹的onClick函数用useCallback包裹:
//useCallback使用,功能同上
const onClick = useCallback(() => {
    console.log('click')
}, []);
因此useCallback是useMemo的变体
useMemo(()=>return fn); //等价 useCallback(fn);
useCallback的使用场景有,父组件中包含两个子组件,子组件有绑定事件,父组件重新渲染时不希望其中一个子组件渲染,需要对该子组件的绑定事件,执行useCallback。相当于保存了函数作为对象的引用的地址,确保了父组件渲染时,函数句柄没变。
3.组件懒加载(lazy Suspense react-loadable)
const OtherComponent = React.lazy(() => import('./OtherComponent'));
function MyComponent() {
  return (
    <div>
      <Suspense fallback={<div>Loading...</div>}>
        <OtherComponent />
      </Suspense>
    </div>
  );
}
OtherComponent是通过懒加载加载进来的,所以渲染页面的时候可能会有延迟,但使用了Suspense之后,可优化交互。 在
fallback 属性接受任何在组件加载过程中你想展示的 React 元素。你可以将 Suspense 组件置于懒加载组件之上的任何位置。你甚至可以用一个 Suspense 组件包裹多个懒加载组件。
const OtherComponent = React.lazy(() => import('./OtherComponent'));
const AnotherComponent = React.lazy(() => import('./AnotherComponent'));
function MyComponent() {
  return (
    <div>
      <Suspense fallback={<div>Loading...</div>}>
        <section>
          <OtherComponent />
          <AnotherComponent />
        </section>
      </Suspense>
    </div>
  );
}
4.React 错误处理(componentDidCatch)
React脚手架配置
1.react-app-rewired
通过create-react-app创建的react项目隐藏了webpack的配置文件。如果需要修改配置,可以通过npm run eject来暴露出各个配置文件。如果不想暴露出原始配置文件,还可以通过react-app-rewired插件来修改webpack配置,根目录的"config-overrides.js"文件,相当于在外部修改了配置。
新版本的react-app-rewired需要customize-cra插件来重写webpack配置。注意,如果用这种方式修改配置后,再通过npm run eject来修改原始配置文件,原始配置将无效。很多第三方库都是基于react-app-rewired来实现的,如ant等
// config-overrides.js
const {
  override,
  fixBabelImports,
  addWebpackPlugin,
  addWebpackAlias,
  addWebpackExternals
} = require("customize-cra");
const path = require("path");
const UglifyJsPlugin = require('uglifyjs-webpack-plugin');
const ProgressBarPlugin = require("progress-bar-webpack-plugin");
const { BundleAnalyzerPlugin } = require("webpack-bundle-analyzer");
// 查看打包后各包大小
const addAnalyzer = () => config => {
  if (process.env.ANALYZER) {
    config.plugins.push(new BundleAnalyzerPlugin());
  }
  return config;
};
module.exports = override(
  fixBabelImports("babel-plugin-import", {
    libraryName: "antd-mobile",
    style: "css"
  }),
  process.env.NODE_ENV === 'production' && addWebpackPlugin(new UglifyJsPlugin({
    uglifyOptions: {
      compress: {
        drop_debugger: true,
        drop_console: true
      }
    }
  })),
  addWebpackExternals({
    "react": "React",
    "react-dom": "ReactDOM"
  }),
  addAnalyzer(),
  addWebpackPlugin(
    new ProgressBarPlugin()
  ),
  addWebpackAlias({
    ["@"]: path.resolve(__dirname, "src")
  })
);
2.http-proxy-middleware
通过http-proxy-middleware可以实现node服务代理发送请求,主要解决测试环境跨域等问题.
在src目录创建setupProxy.js,添加需要代理的请求路径
const { createProxyMiddleware } = require('http-proxy-middleware');
module.exports = function(app) {
  app.use('/api', createProxyMiddleware({
    target: 'https://api.xxx.com',
    changeOrigin: true,
    pathRewrite: {}
  }));
};欢迎转载:转载时请注明本文出处及文章链接